Loving cloth wipes? You can use them dry, but for extra messy diapers it's best to use wet cloth wipes. You can use just plain water, but using a solution can be soothing to baby's bottom--especially if baby has a diaper rash.
****Please note that you should never soak then store your wipes at room temperature. They will grow mold that way. You have two options: either keep your wipe solution in a spray bottle and spray wipes prior to use OR if you do soak your wipes, store them in a wipe warmer.
Supplies:
-1 Cup Water
-1 Teaspoon Baby Oil (or Olive Oil)
-1 Teaspoon Baby Wash or Shampoo
-1 Teaspoon of Calendula Oil (optional-great for treating or preventing diaper rash)
-Mix all together and store in a spray bottle.
Showing posts with label tutorials. Show all posts
Thursday, June 30, 2011
How to Make Your Own Cloth Wipes
Cloth wipes are fabulous and amazing. I feel like they clean better than disposable wipes, they are super soft on baby's skin, and easy on the budget...if you make them yourself. Cloth wipes available to buy are usually $2 a piece or more, which is crazy to pay when they are so simple to make. I promise you will love using cloth wipes!
Supplies:
-Fabric of choice (I recommend flannel or another soft, cotton alternative)
-Thread
-Sewing machine
-Scissors
While you can simply use scraps of fabric (some prefer oval shaped wipes), I like having wipes that fit perfectly into my travel wipe case. You could use 8 x 8" pieces and fold them, but I prefer having smaller wipes.
-Cut an even total of 4" x 8" pieces of your fabric.
-Sew them together using a tight stitch. If you want a clean edge, use a tight zigzag stitch along the edge. If you want a frayed edge, a tight straight stitch is perfect.
Tuesday, June 28, 2011
Fringe Hair Band
This is an easy project and it dresses up a simple ponytail. You can use multiple colors for a more rainbow effect or team colors for your favorite team. These would make great cheer bows too. You can use fatter ribbon, skinny ribbon, or even strips of scrap fabric. The possibilities are endless. I went for a shorter, more subtle fringe effect.
I used 3/16" feather edge ribbon in navy.
Supplies needed:
-1 hair elastic (I selected black since it was the closest color I had to navy)
-Ribbon of choice
-Scissors
-Lighter (or preferred method of sealing the ends of your ribbon)
You want to cut your ribbon in 3" strips, sealing each end. You will want to have about 40-50 pieces of ribbon, more or less depending on the width of your ribbon and size of your hair elastic.
Tie ribbon in a square knot on elastic. Continue around hair elastic until it's entirely covered.
It's that simple!
Sunday, June 12, 2011
How to Make a Flower Clip
Flower clips are so simple and add a little extra something to even just a ponytail. I wear them all the time and put them on a headband for Baby Ruffles.
Supplies:
-Flower
-Alligator Clip (single or double pronged)
-Hot Glue Gun
-3/8" Ribbon
Directions:
-Taking your flower and remove the plastic back.
-Remove each layer from the stem.
-Replace each layer, gluing each layer as you go. This will prevent the flower from being floppy while maintaining a little more structure.
-Trim the excess stem.
-Cover alligator clip with ribbon. Glue.
-Glue the bottom of your flower and attach to your clip.
That's it!! Isn't it incredibly simple? Now go make on in every color!
Like my flower? It was purchased from The Ribbon Retreat.
Tie Card
Father's Day is fast approaching. Have you made a card yet? Don't sweat it if you haven't...this one took maybe 20 minutes. It's super easy and so cute. I've seen several all-paper versions of these cards on some of my favorite blogs and crafts sites, but no one made a tie out of ribbon! I went for a very low-key striped shirt/solid color tie version for my low-key guy, but you could make wacky styles with patterned ribbon and paper. The possibilities are endless.
Supplies:
-1 sheet Cardstock Paper
-5/8" or 1" Ribbon
-Pen or Colored Pencil
-Glue (I used a hot glue gun)
-Lighter or Ribbon Sealing Method of Choice
-Paper Cutter (optional) or Scissors
Directions:
-Cut paper into card size. You could do an envelope size or make yours tall and skinny or short and stout to make it even more personalized.
-Find the center of the top of the front of your card and make a 1 inch cut.
-Fold back to create the "collar" of the shirt.
-Cut a length of ribbon the length you want your tie.
-Cut one end into a "V" shape. Heat seal ends.
-Cut another piece of ribbon about 1 inch. Make sure it wraps around your ribbon tie.
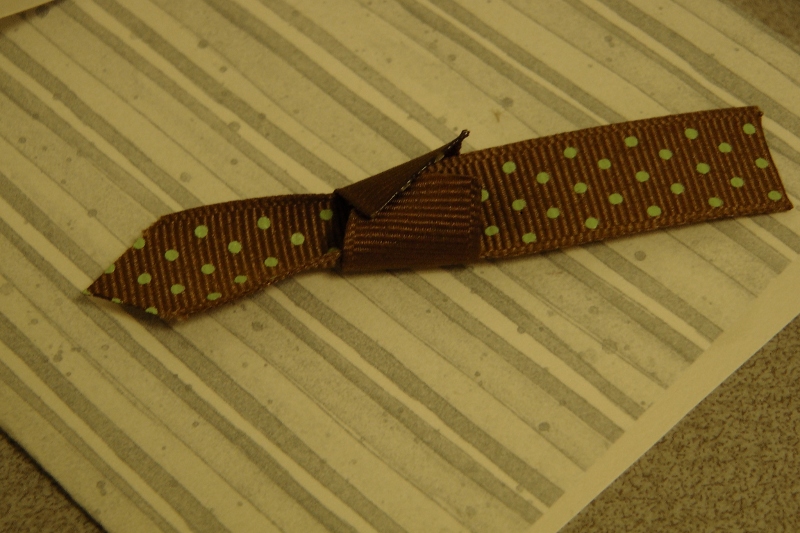
-Make a tiny loop, angle one end and glue. It should look the picture.
-Thread the long piece of ribbon tie through the loop you just made.
-Once the ribbon tie and loop are in place (meaning no ribbon is sticking out of the "top" of the tie), glue in place.
-Trim the access from the loop that is sticking out at the "top" of your tie. Heat seal ends.
-Glue completed ribbon tie in place.
-With a pen or colored pencil, add details, like buttons, pockets, etc. I just did buttons.
-Now it's complete!
Subscribe to:
Posts (Atom)